
Zoom Tips and Tricks
Setting up Polls
See the Zoom Help Center for information about setting up polls. You will need to allow for polls in your account settings and can create polls in advance of a scheduled meeting/class.
Polls can be an anonymous tool to gather feedback from students or conduct a comprehension check. Poll responses can also be attached to individual students and used to record attendance/participation or check for comprehension. You have the ability to download a report from the poll.
Breakout Rooms
For instructions on setting up Break Out rooms, see the Zoom Help Center. There is a feature to pre-assign Break Out Rooms which is helpful but you must have the email addresses that each student/participant is using for their Zoom log in for this to work.
Just as you would in the classroom, consider the best way to set your groups. Do you assign the groups? Do students pick their own groups? Do the groups stay the same throughout the semester? Consider what is the best pedagogical practice based on the desired learning outcomes.
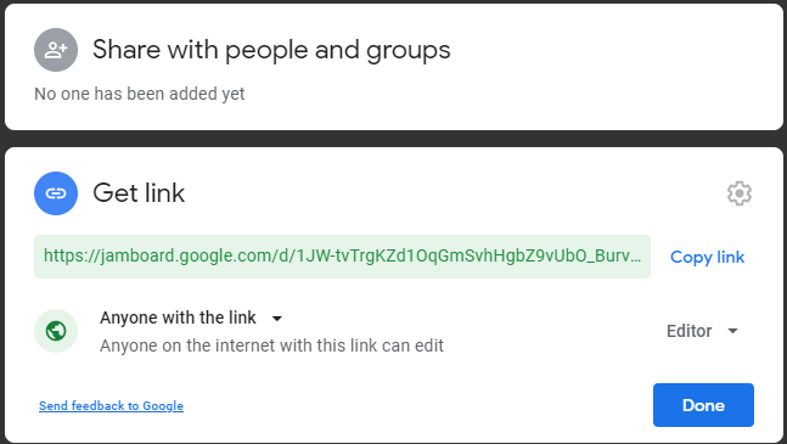
Setting Up Jamboards
- Jamboards are available with a Google account.
- Click the orange plus sign (bottom right) to set up a new board.
- You can list instructions in advance on each board, set up multiple pages, etc.
- Click blue Share button (top right) and set up user permissions. For a class assignment, set the privacy settings to anyone with the link and Editor (see screenshot below). This will allow students to edit the Jamboard.
- If using a Jamboard in conjunction with breakout rooms in Zoom, make sure to share the instructions and jamboard links prior to sending everyone to the breakout rooms.
Designing a Virtual Background
- See Zoom Help Center for more details about setting a virtual background.
- Programs like Canva can be used to design your own background.
- You can also Share Slides as a Virtual Background!
Setting Up Virtual Office Hours
- Set up a recurring meeting in Zoom with a waiting room. Click on Schedule then check the box next to “recurring meeting.” Click on Advanced Options to check box next to “Enable Waiting Room.” This will set up a link that can be used at any time. The waiting room will prevent a student from interrupting a meeting with another student. For more see Zoom Help Center Article.
- You can have students sign up for your office hours (or for a meeting) in advance using Microsoft Bookings (part of the UA Microsoft 365 license). Go to the Microsoft Bookings website for more details about seeing up a Bookings page. Once you set up your site, you can use your Zoom Office Hours link in the confirmation email to students. It will add the appointment to your calendar, send an email confirmation to the student, and provide the student the option to add the appointment to their calendar.
Creating a Zoom Event with Registration
- Go to https://zoom.us/ and log in via the website. Click on Schedule a Meeting. When setting up the meeting details, click on Recurring Meeting. An option will appear for Registration. Check the “Required” box. Once you set the registration required feature up, you can have attendees select specific event times or register for a single event.
- Once you save the event, you will have the option to customize the registration page, set up automated emails, and preset any polls or live streaming. You can view who has registered in advance. For more details on how to set up a Zoom event with advance registration, see the Zoom Help Center.
To view the video from this OLIS session, visit our Webinar Recordings page.